Mixed martial arts is a dynamic, exciting sport. It's also highly technical, and for someone who may not be familiar with it, you can watch MMA and have no idea what you're seeing. An elementary understanding why striking works is almost innate, but when it comes to submission attempts, ground game and grappling positions, the goals may not be as readily apparent.
Following Patrick Wyman's MMA in 10 Moves: A Technical Introduction, this list is 10 grappling-specific moves we see in MMA. Transitions in grappling can happen so fast, it can be difficult for the uninitiated to keep up. So in this piece, I'll explain why a submission works, what to look for to recognize a set up and common defenses for the submission. Most submissions have numerous variants and can be set up or achieved from multiple positions; as a primer, this piece breaks down the fundamental mechanics of a basic version of the submission.
I'll also review three positions, how they control the opponent, their weaknesses and the opportunities they can offer.
We'll start with submissions and proceed in alphabetical order. First up...
Submissions
Americana/Keylock
While kimuras are referenced more frequently in MMA, the Americana incorporates the same mechanics and is essentially the same technique. This submission is primarily a shoulder lock, often achieved when Fighter A has full mount on Fighter B or has Fighter B in side control.
Structure: From mount, Fighter A reaches across Fighter B with her right arm to secure a grip on Fighter B's right wrist, with Fighter B's palm facing up. To further immobilize Fighter B, Fighter A should shove her right elbow against Fighter B's neck, forcing B's head off-center. Then, Fighter A reaches under Fighter B's bicep with her left hand and grabs her own right wrist, creating a "figure-four" control on Fighter B's right arm. From there, Fighter A pulls the structure down the mat, toward the hips, keeping the arm pinned to the mat.
To finish the submission, Fighter A holds Fighter B's wrist against the mat while she raises her left elbow. Since Fighter B's wrist and shoulder stay on the mat, the flexion on the shoulder causes damage very quickly.
Keys to success: Pulling the structure toward the hips and keeping the wrist pinned to the mat.
Defense: Once the figure-four is on, the threat is imminent and hard to avoid, so defenses need to be fast and usually leave Fighter B in a still very vulnerable position. The best defense is for Fighter B to grasp her hands above her head as soon as her wrist is grasped and turn to her side. Breaking that grip is difficult, so you often see Fighter A transition to S-mount and keep control of the arm, sometimes resulting in an armbar attempt.
Examples: Jon Jones vs Vitor Belfort, Shinya Aoki vs Yokthai Sithoar, Dan Severn vs. Dave Beneteau, Josh Barnett vs. Alexander Emelianenko, Antonio Rodrigo Nogueira vs. Valentijn Overeem
Armbar
Behold! The merciless efficacy of the armbar, first illustrated at UFC 2 by Royce Gracie on an unwitting Jason Delucia, always makes for an exciting finish. As we've seen through the years, armbars can be hit from a variety of positions from seemingly endless set ups. The armbar attacks the elbow and results in plenty of broken arms, if not released in time. There are so many aspects that can be tweaked, attempting to address a fraction of them could fill a series devoted solely to arm bars; this is a breakdown of the mechanics of the basic, traditional armbar.
Structure: The traditional armbar entails Fighter A isolating one of Fighter B's arms, which is possible through a variety of ways, and wrangling Fighter B into a position that allows him to throw one leg over the front of Fighter B's head while seated perpendicular to Fighter B's shoulder. If the other leg can cross Fighter B's chest to have a leg on either side of the arm, that's ideal, but the armbar can be finished without it.
While there are multiple variations, most armbars entail using the hips as the fulcrum, above which the opponent's elbow is hyperextended as Fighter A straightens his body. If that motion doesn't result in a submission—sometimes due to the thighs not squeezing tightly enough—Fighter A will further extend his hips.
Keys to Success: Fighter B's elbow needs to be above Fighter A's groin. Wrist control—the chances for success are increased when Fighter B's thumb is pointing up, which means Fighter A's hip extension doesn't need to be at an angle. Fighter A should squeeze his legs and pull his heels in tight, minimizing any space between him and Fighter B.
Defense: The first line of defense is for Fighter B to get a grip on his own arm, requiring Fighter A to break the grip before he can continue the armbar attempt. This is a stalling tactic, not an escape, but is vital to virtually any escape attempt. Escape attempts include standing up and slamming, the hitchhiker (which offers solid opportunity for reversals), a stacking defense that takes away leverage and pulling the elbow to the mat while turning to the side, a variant of which is shown here.
Examples: Ronda Rousey vs Miesha Tate 2, Ronda Rousey vs Cat Zingano, Ronda Rousey vs Liz Carmouche, Ronda Rousey vs Sarah Kaufman, Diego Brandao vs Dennis Bermudez, Frank Mir vs Tim Sylvia, Matt Hughes vs Georges St. Pierre, Anderson Silva vs Chael Sonnen, Royce Gracie vs. Jason Delucia
Arm Triangle
So called because the arms of the attacker make the same structure around the neck and arm of her opponent as a traditional triangle, the arm triangle is a highly technical and fast-acting submission. Usually set up from full mount or side control, the limited defenses mean that, when applied correctly, the rate of return is good. The arm triangle is a blood choke (or strangle).
Structure: From mount, Fighter A scoops Fighter B's head with her left arm, applying shoulder pressure to the jaw for control. Her right arm threads under Fighter B's left arm, working it upward until it's by Fighter B's own ear. Fighter A presses her head against that arm, effectively pinning it to Fighter B's head, and maintains pressure to keep it from lowering.
The next step is to close the structure; this can be done with a grip, but Fighter A will find greater control by putting her left hand on her right bicep (as you see in rear-naked chokes) and then tucking her right hand behind her head. Fighter A's left shoulder needs to slide from from the jaw down to the neck.
While the arm triangle can be finished in mount, it's much more common that Fighter A will dismount to side control, on her right-hand side (same side her head is on), and may begin "walking" around the mat to position herself perpendicularly to Fighter B.
Keys to Success: Fighter A's head pressure against Fighter B's arm, pinning it against Fighter B's own neck; keeping the arm immobile is vital to completion. Keeping her shoulder against Fighter B's neck is necessary as well. For arm triangles achieved on the mat (versus standing, as in Jessica Eye vs Zoila Gurgel below), Fighter A needs to keep her left forearm flat on the mat.
Defense: The defense I see employed most in MMA is to "answer the phone," which means Fighter B brings her left hand to her left ear and pushes against the structure with her elbow. As evidenced in Brock Lesnar vs. Shane Carwin above, this doesn't always work. Another defense is for Fighter B to reach down and clasp both hands behind her own leg and push, using that strength to pull her shoulder away from her neck and create enough space to stave off unconsciousness. From there, Fighter B can roll on her side, away from the choke, if Fighter A hasn't already released the hold.
Examples: Jessica Eye vs. Zoila Gurgel, Jacare Souza vs. Chris Camozzi, Jacare Souza vs. Alexander Shlemenko, Marcus Aurelio vs Takanori Gomi
Guillotine/Arm-In Guillotine
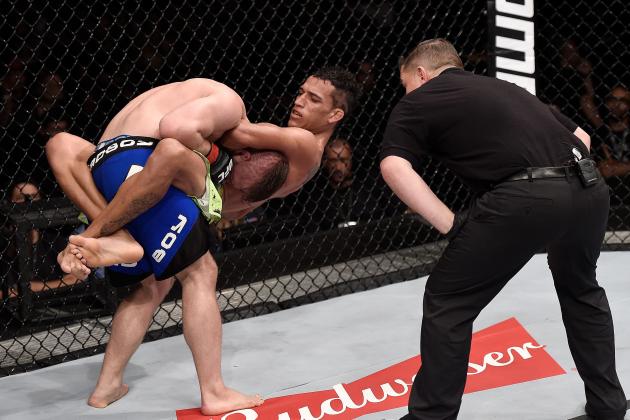
The guillotine is a versatile submission; with numerous set ups possible from multiple positions, the opportunities seem plentiful. However, this blood choke has a number of small details integral to success. Often achieved on an opponent's bad level change during a takedown attempt (see: Fabricio Werdum vs. Cain Velasquez), the guillotine can be finished standing, with the opponent in guard, and from full mount.
Structure: Fighter A, while facing Fighter B, needs to get Fighter B's head beneath his right arm and wrap it around Fighter B's neck. This can be established either through a sloppy takedown attempt (such as double leg) where Fighter B bends at the waist to change levels rather than bending at the knees, thereby exposing his neck, or by Fighter A moving himself or his opponent off center, allowing him to reach up and around the back of the neck.
For the traditional guillotine, Fighter A grabs his right hand and physically pulls or pushes it up with his left while driving his hips forward. This creates the necessary height to choke or tightness to strangle. Guillotines on the ground utilize similar mechanics to finish.
Keys to Success: Fighter B's posture has to be broken down, with his head off-center and his neck trapped securely in the bend of Fighter A's arm, which is why the set up is achieved so easily on bad takedown attempts. Ensuring Fighter A's right arm stays on the back of the neck and doesn't slip onto the head is necessary, or Fighter B can pull his head out with relative ease.
Closing the distance between the fighter's hips is vital; without doing so, Fighter A won't have the leverage to finish, as we just saw with Louis Smolka's high-elbow guillotine attempt on Paddy Holohan at Fight Night 76.
Defense: If Fighter B can grab Fighter A's forearm and pull downward, he'll buy a little time to work on nullifying the threat or escaping, although you don't see this very often in MMA. He can do that by keeping his hips back and away, including blocking Fighter A's hips with his hands. Posturing and looking up uses superior back and leg strength to Fighter A's shoulder and arm pressure, breaking the guillotine structure, and has the added bonus of setting up an easy back take.
Another option is for Fighter B to throw his right arm over Fighter A's left shoulder with his hand flat on Fighter A's back, which relieves the upward pressure necessary to finish.
Examples: Fabricio Werdum vs. Cain Velasquez, Renzo Gracie vs. Pat Miletich, Jon Jones vs. Lyoto Machida, Minotauro Nogueira vs. Tim Sylvia, Scott Jorgensen vs. Chad George, Charles Oliveira vs. Nick Lentz, Joseph Benavidez vs. Tim Elliott, Urijah Faber vs. Brian Bowles
Kimura
A close relative of the Americana, the kimura is a judo move originally called ude-garami. Following Masahiko Kimura's submission of Brazilian jiu-jitsu forefather Helio Gracie with it, the move became known as the kimura and filtered through many grappling styles. This shoulder lock is widely used today and, like the Americana, can cause considerable damage very quickly. It's accessible from a variety of positions, especially closed guard, side control and mount.
Structure: From side control with Fighter A on top and on the left side of Fighter B, Fighter A reaches across Fighter B's chest with his left arm to secure a grip on Fighter B's right wrist, with Fighter B's palm facing down. Fighter A's right arm then threads underneath Fighter B's right shoulder and arm to grasp his own wrist.
To limit Fighter B's options to defend, Fighter A should push the figure-four structure away from Fighter B's torso until he can brace his left elbow against it. Pulling the structure up the mat, in the direction Fighter B's elbow is pointing, further immobilizes the endangered shoulder.
To finish the submission, Fighter A lifts the structure and rotates Fighter B's arm backward and up toward the head. As Fighter B's head and shoulders come off the mat, Fighter A will often step over Fighter B's head and exert pressure with his legs or hips to take away Fighter B's space and force him back down.
Keys to Success: Keeping Fighter B's arm away from his body prevents one of the most common defenses. The frame made by bracing the elbow against Fighter B's torso is strong, and Fighter B's already impeded range of motion is comparatively weak. Fighter A needs to keep Fighter B's arm from straightening to finish the kimura, although there are other attacks a straightened arm creates.
Defense: The defense mentioned above entails Fighter B reaching between his legs and grabbing his shorts or thigh. Since the arm has to be away from the body to endanger the shoulder, this defense takes away the submission opening and frequently breaks the figure-four structure. Other defenses, depending on the position from which the kimura is attempted, include rolling forward and straightening the arm and reaching above the head.
Examples: Kazushi Sakuraba vs. Renzo Gracie, Phil Davis vs. Tim Boetsch, Fabricio Werdum vs. Alistair Overeem, Nick Diaz vs. Josh Neer
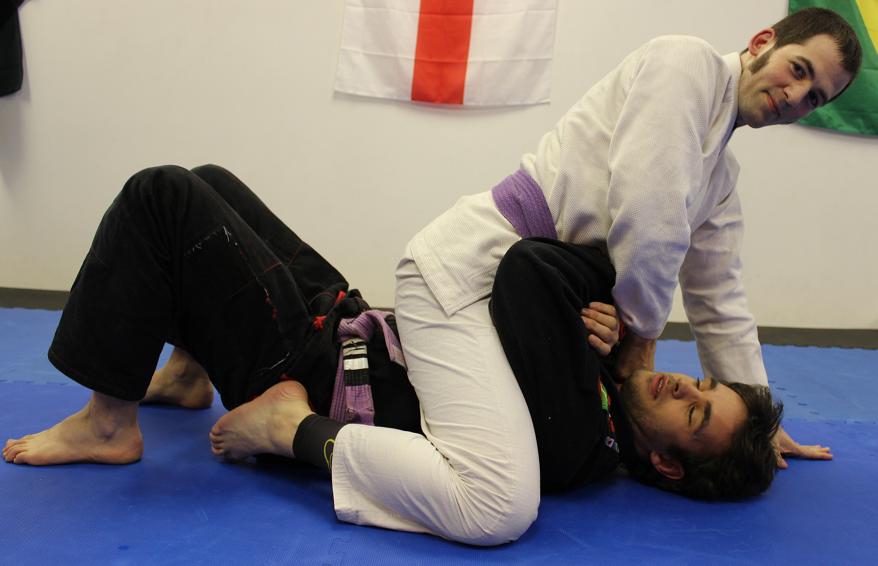
Triangle
The triangle is a blood choke that is difficult to defend. Like the arm triangle, it involves a figure-four, except with the legs instead of the arms. While triangles are not seen all that frequently in MMA, they make for an exciting finish as Fighter B flails like a fish out of water before tapping. Even if Fighter A doesn't get the finish, triangles are an effective control that take some time and effort to escape.
Structure: Fighter A is on her back while Fighter B is in her guard. Fighter B's head and left arm are caught in a figure-four made by Fighter A. Fighter A's left leg is crossed over the back of Fighter B's neck and her right leg folds over her left, with her left ankle secured in the crook of her knee. While setting up the triangle and before crossing her right leg over her left, Fighter A may reach up with her right hand and grab her left shin close to the left side of Fighter B's head. This limits Fighter B's options to escape the set up.
While it's helpful to have Fighter B's left arm reaching across toward her right, it's not necessary to finish the choke. To finish, Fighter A squeezes with her thighs, sometimes pulling Fighter B's head down with both hands.
Keys to Success: Fighter A's left shin/calf should be parallel to the mat after it's in position around Fighter B's neck. It should to be straight across Fighter B's neck, rather than angling back toward the shoulder. Fighter A can make this adjustment by using her hands to push on her left knee or by grabbing her left shin or ankle and pulling it toward her. Taking away any space is instrumental in completion, so the crook of Fighter A's left leg should be tight against Fighter B's neck.
Additionally, it's important that the right leg folds over the left ankle, not the foot. With the flexion of the foot, it's usually not tight enough for completion.
Defense: Sometimes a slam is possible, especially if the triangle was set up from standing. Posturing up and looking upward will buy time, as Fighter B's posture needs to be broken down to complete the triangle. The gloves make it difficult, but if Fighter B can work her right hand in between the legs from the back, just enough to grasp her hands together, she may have enough leverage to create some space.
Alternately, she can reach her left arm back and around Fighter A's right leg and grab her own right wrist, which also creates space and may expand her shoulder some. Fighter B can sit back as Chael Sonnen did in the example above, but that doesn't always work.
The best defense is not allowing the triangle to fully close. Once it's closed, it's extremely difficult to get out of.
Examples: Demian Maia vs. Ed Herman, Demian Maia vs. Chael Sonnen, Nate Diaz vs. Kurt Pellegrino, Daiju Takase vs. Anderson Silva, Fabricio Werdum vs. Fedor Emelianenko, Jessica Penne vs. Naho Sugiyama
Von Flue
Sometimes called a shoulder choke, the Von Flue is a clever form of retribution for a failed guillotine attempt. At UFC Ultimate Fight Night 3, Jason Von Flue submitted Alex Karalexis with the choke, which he then had to explain in his post-fight interview. While Von Flue finishes aren't particularly common, they're especially gratifying because they capitalize on such an elementary mistake.
Structure: A common defense when on the receiving end of a guillotine attempt is to take Fighter B down and into side control. If Fighter B tries to hang on to the guillotine, which is virtually never finished while in the bottom in side control, the opportunity for the Von Flue presents itself.
After the failed takedown attempt, Fighter B's left arm is around the back of Fighter A's neck. With Fighter B in side control and against his right side, Fighter A scoops the head with his left arm and reaches across Fighter B with his right arm, trapping Fighter B's left wrist in his armpit.
With the head scooped, Fighter A can push his left shoulder into the neck and drive his weight forward, or come to a tripod-like position and push his weight down into the neck. As in the example above with Ovince St. Preux and Nikita Krylov, the choke can quickly put people to sleep.
Keys to Success: Keeping Fighter B's hand trapped in the armpit will take away much of the defense. The rest is obvious: good shoulder pressure, keep the head scooped tight.
Defense: If Fighter B's guillotine attempt fails and he's being taken down into side control, he can completely nullify the threat by releasing Fighter A's head. If Fighter A's center of balance is too far over Fighter B, it's possible to roll Fighter A.
Examples: Jason Von Flue vs. Alex Karalexis, Derrick Krantz vs. Brock Larson, Chad George vs. Mark Vorgeas, David Branch vs. Jesse McElligott
Half Guard
Half guard is a position most fighters don't aim for, but end up in—either put there by a defending opponent or grasping for it to keep from suffering an even worse fate. Undesirable as it may be, half guard is a versatile position that can be advantageous for either opponent, with sweep opportunities from the bottom, multiple ways to pass from the top and some attack openings from both. Half guard also acts as a defense on the bottom to immobilize the top fighter and complicate her attacks. Mitch Clarke did this with great success in his fight with Al Iaquinta. Half guard from the bottom is best utilized by grapplers who have trained it extensively;
Structure: Fighter A is on top of Fighter B on the mat, and Fighter B wraps her legs around one of Fighter A's, above the knee. Fighter B's legs are often secured in a figure-four, with one ankle tucked securely behind her other knee. When Fighter B is flattened on the mat, Fighter A has the advantageous half guard.
When Fighter B is on her side and bending in half, keeping her head low and deep between Fighter A's legs, she's in excellent positioning for sweeps and a few attacks. Sweeping from the bottom requires disrupting Fighter A's balance, which Fighter B can achieve by leveraging herself underneath Fighter A's center of gravity.
Potential attacks/transitions
Several of the submissions listed below can start to be set up in half guard and are completed after transition.
From top: Pass into side control, S-mount, or full mount and pursue submissions from there; guillotine, punches, elbows, kimura, armbar, d'arce.
From bottom: Full guard recovery, back take; kimura, straight armbar, guillotine, twister, various leg locks (if you're Rousimar Palhares)
Weaknesses: If Fighter B doesn't quickly sweep or attack, she can easily get stuck clinging to a leg control that does nothing except keep her underneath Fighter A's attacks. Half guard bottom is overall a dangerous place to be, and as noted, fighters usually end up in half guard rather than seek it.
Examples of effective use: Antonio Rodrigo Nogueira, Fabricio Werdum, Mitch Clarke, Frank Mir, Wilson Reis, Rousimar Palhares
Mount
Mount is a close runner-up to rear mount as the best position. Fighters want to get mount and don't want to be in it. The top position is excellent for both striking and for submission attempts, and the fighter on the bottom is not only extremely vulnerable, but has to contend with escaping from a very dominant control.
Structure: Happily, the structure is simple. Fighter B is on her back, while Fighter A, kneeling, straddles her midsection. Small adjustments can be incorporated to create anticipated reactions, set up submissions, immobilize a joint and so on.
For example, if Fighter A drives her hips downward and much of her weight off her knees, the pressure on Fighter B is greatly increased, further limiting mobility. Fighter A can also grapevine her legs underneath and around Fighter B's, which reduces the knees' range of motion. Paired with hip pressure, it's a brutal position to be stuck in.
There's also a variation called high mount, which sees Fighter A working her way up Fighter B's torso. This takes her out of reach of Fighter B's legs and removes her from the position most affected by any bridging Fighter B tries. Sometimes, the mount is high enough that Fighter B's arms are forced upward, exposing them even more, and Fighter A can squeeze the shoulders with her knees.
Potential Attacks/Transitions: Nearly limitless. Great for ground-and-pound. Usually, if a fighter goes for a sub from mount, it'll be attacking the arm or shoulder. Armbars, kimuras, Americanas. There are plenty of chokes available from mount, including arm triangles. Mounted guillotines are another option, though they're more likely to be the result of a transition from another position. With a high enough mount, fighters can even set up triangles.
Weaknesses: Few, if any. The biggest risk is that Fighter A's body is within reaching distance, which could potentially provide a short-lived, meager defense. The more flexible fighters on the bottom can bring their legs up and try to snag Fighter A by the armpits. If Fighter B is able to bridge and roll to the side, she'll end up in Fighter A's closed guard.
Examples of effective use: Gunnar Nelson, Tonya Evinger, Cheick Congo, Fedor Emelianenko, Dan Henderson, Cain Velasquez, Charles Oliveira, Jacare Souza, Shinya Aoki, Shogun Rua
Rear/Back Mount
Easily the most dominant position one fighter can get on another, rear mount affords Fighter A numerous advantages and ample protection. The only parts of Fighter A's body that are exposed are portions of his limbs. His head may be exposed, but Fighter B typically can't take advantage of it in any meaningful way—striking backwards over your own shoulder isn't exactly powerful.
Structure: In a seated position, Fighter A has Fighter B seated between his legs, back to Fighter A. Fighter A will get his hooks in by bringing his feet up and planting them against Fighter B's inner thighs. Outward pressure with the feet helps limit Fighter B's hip mobility. It's dangerous for Fighter A to cross his feet in this position, because Fighter B can cross one of his legs over Fighter A's feet and go for an ankle lock. Sometimes, Fighter A will manage a body triangle on Fighter B, which is uncomfortable, puts a lot of pressure on the diaphragm and can be moved up the torso to squeeze the ribs.
While there are several grips people may use from rear mount, many fighters default to the seat belt grip. This entails Fighter A's right arm going over Fighter B's shoulder and across his chest, while his left arm slides under Fighter B's left arm to grab his own right wrist. Generally, the bottom hand (left, in this example) will grasp the top hand to protect it, as the top hand can threaten Fighter B the most with chokes and Fighter B will first attack the grip at the most exposed hand.
Potential Attacks/Transitions: Almost all of them. Leg locks, kimuras, and Americanas are less readily available, but rear mount is especially great for chokes and armbars. When Fighter A can get Fighter B to turn over onto his stomach, the ground-and-pound from there is brutal, especially when Fighter A pins Fighter B to the mat with his hips.
Weaknesses: None inherent, really. If Fighter A doesn't have a good rear mount game, Fighter B should be able to escape with relative ease. If Fighter B then ends up on top, Fighter A will have accomplished nothing and ended up in the inferior position.
Examples of effective use: Charles Oliveira, Jacare Souza, Shinya Aoki, BJ Penn, Gunnar Nelson, Tonya Evinger, Urijah Faber, Joe Doerksen, Louis Smolka, Demian Maia, Royce Gracie, Jessica Penne
Proficient grappling at work is a fascinating thing to see. So in parting, I'll leave you with 20 of the best submissions in the UFC. Curious about a move, position or submission? Let us know in the comments!


